Insert buttons
Press the button in the Formatting toolbar to reveal special inserable items and blocks such as symbols, Math expressions and separators.
Bookmarks
See the dedicated Anchors section.
New child note
Choose New child note to create an empty child note of the current note and insert a link to it at the cursor. The new note opens in Quick edit with its title selected, so typing names it, and the link shows the new title. While the note is still empty, Quick edit offers the note types to turn it into.
The same action is available as Create a new child note in the Slash Commands. A child note of a protected note is protected too.
Emoji
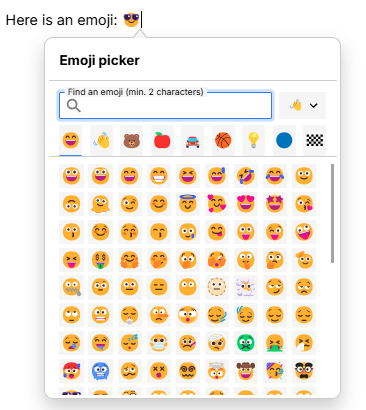
This feature allows inserting Unicode emoji characters. Simply select a category and a desired emoji to insert it.
Emojis can also be searched by their English name and the skin tone can be selected via a combo box to the right.
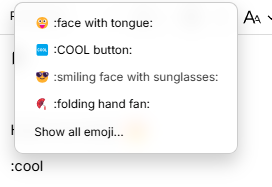
There is also the possibility of inserting emojis directly by typing : followed by a name of an emoji, triggering the display of a list of emojis. Simply use the arrow keys to select one and press Enter or Tab to insert it.
Symbols

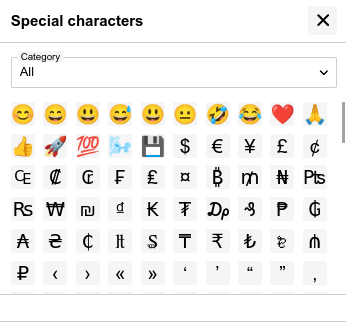
Pressing the button will reveal a popup window displaying a list of characters that are generally more difficult to insert directly from the keyboard, such as a subset of emojis, quotation characters, etc.
Interaction:
- Click on a character to insert it at the current cursor position.
- The window can be dragged around by the top bar where the title is, to avoid it getting in the way of the text.
- Click on the Category selector to filter the characters.
Multicolumn layout
See the dedicated Multicolumn layout page.
Extended code block
Choose Extended code block to insert a code block that is edited as a code note. This entry is experimental and is shown only once it is turned on. See Extended code blocks in Code blocks.
Math equations
See the dedicated Math Equations page.
Drawing canvas
Choose Drawing canvas to draw on an Excalidraw canvas inside the text. See Drawing canvases in Include Note.
Mermaid diagram
Press the button to create an inline Mermaid diagram. The arrow next to it lists a template for each kind of diagram. The diagram is also available as Mermaid diagram in the Slash Commands.
This feature is quite similar to the Mermaid Diagrams note types and is meant as an alternative to it for simple diagrams. For more complex diagrams, use the Include Note feature for a dedicated Mermaid note.

A diagram shows in a box like the one of an included note, so it can be resized, given another box size (Resizable or Full) from its More actions menu or shown in fullscreen, as described in Include Note.
- The Editable button at the start of the diagram's toolbar decides whether its source can be changed. While it is off, the source still shows, but read-only.
- The buttons next to it choose what the diagram shows, as for a Mermaid note: Source view for the Mermaid source alone, Split view for the source with the diagram next to it, and Preview for the diagram alone. Its More actions menu offers the same choice.
- The Word wrap and Line numbers submenus of its More actions menu change how the source shows, each with Auto, On and Off, as for an included code note (see Editing an include in place in Include Note).
- A new diagram starts editable, in Split view. The diagram updates a moment after you stop typing. If the source has an error, the error shows over the last diagram that worked, which stays dimmed, as in a Mermaid note. On desktop, drag the divider between the source and the diagram to resize them.
- A diagram without a chosen view shows the source next to the diagram while it is editable, and the diagram alone otherwise. In a read-only note, the source can never be changed. A read-only note and the AI chat show a diagram in the same box, in the view it was saved with, and with the zoom buttons over the diagram instead of in a toolbar. A Medium or Full diagram also has a Fullscreen button there, or over the source in the Source view.
- To zoom, use the and buttons of the diagram's toolbar; the zoom level between them resets the zoom. In fullscreen, where the toolbar is hidden, the same buttons show over the diagram. Drag the diagram to move around it, and double-click it to reset the view. The mouse wheel scrolls the note until you click the diagram, and then zooms it.
- While the source shows, the Mermaid syntax help button at the end of the toolbar opens the help on Mermaid Diagrams, which links to the Mermaid syntax.
- The changes made to the source of a diagram are part of the undo history of the text note, in the order they were made. Ctrl+Z and Ctrl+Y undo and redo them from the source as well as from the text, as described in Editing an include in place in Include Note.
The source of the diagram stays in the note as a Mermaid code block, so the diagram is exported to Markdown as a mermaid code block that other applications can show.
Diagrams created in earlier versions keep the view they were saved with, and open editable.
Audio/video embed
Choose Audio/video embed to insert a YouTube video, or an audio or video file from its web address, that can be played inside the note. Paste the address, then press Insert media or Enter. The media is inserted as a link preview in the Embed display mode, described in Link Previews. The same action is available as Audio/video embed in the Slash Commands.
Horizontal ruler
This feature will display a horizontal line, generally useful to separate different sections of the text. To do so, press the button in the Formatting toolbar.
Alternatively, it's possible to insert a horizontal ruler by typing ---.
Page break

Page breaks provide a way to force the next paragraph or block (table, image, etc.) to be displayed onto the next page when printing (either to a real printer to when exporting to PDF).
Page breaks are marked in the editor with the words Page break, but they will not actually be shown when printed.
- To insert a page break, press the in the formatting toolbar.
- To insert many page breaks at once, insert a page break first, click on it and press Ctrl+C. Then use Ctrl+V, to paste as many times as needed.
Footnotes
See the dedicated Footnotes page.
Date and time
The button inserts the current date and time at the cursor, replacing the selected text if there is any. The inserted text takes the formatting of the text around it, so a date inserted inside bold text is bold too.
- To insert the date in the default format, press the button itself or press Alt+T.
- To insert it in another format, press the arrow next to the button and pick a format from the list. Each entry shows the current date and time in that format: the default one, the date or the time alone, the date written out, and ISO 8601.
- The same formats are offered by the Slash Commands: type
/date,/time,/nowor/today. The Insert date/time entry uses the default format, and shows what it inserts underneath; the other entries show their output in the title.
The default format can be changed in Options → Text Notes → Editor → Date/time format, using Day.js format tokens (for example DD.MM.YYYY HH:mm).
Icons
Icons just like the ones for the note icon can be inserted in text. For more information see Icons.