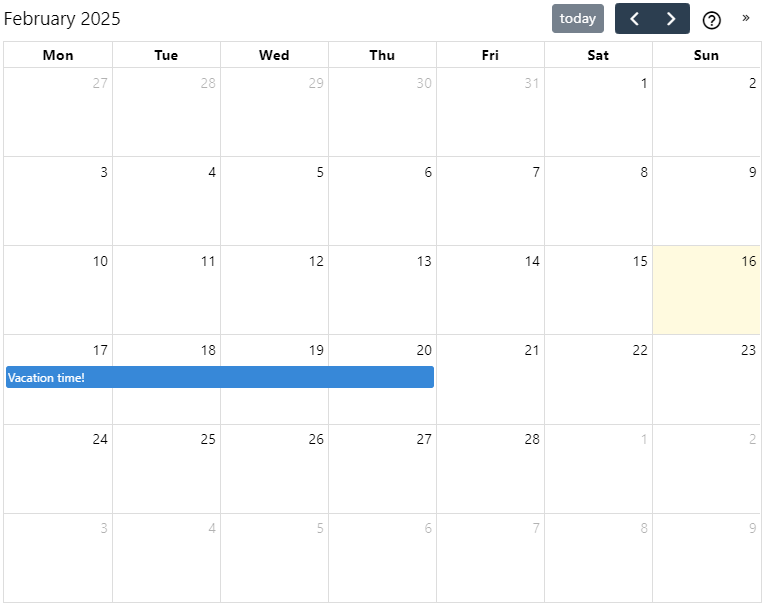
Calendar
The Calendar view will display each child note in a calendar that has a start date and optionally an end date, as an event.
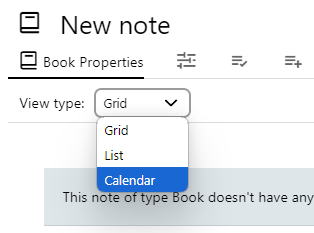
The Calendar view has multiple display modes:
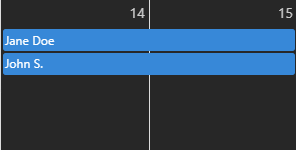
- Week view, where all the 7 days of the week (or 5 if the weekends are hidden) are displayed in columns. This mode allows entering and displaying time-specific events, not just all-day events.
- Month view, where the entire month is displayed and all-day events can be inserted. Both time-specific events and all-day events are listed.
- Year view, which displays the entire year for quick reference.
- List view, which displays all the events of a given month in sequence.
Unlike other Collection view types, the Calendar view also allows some kind of interaction, such as moving events around as well as creating new ones.
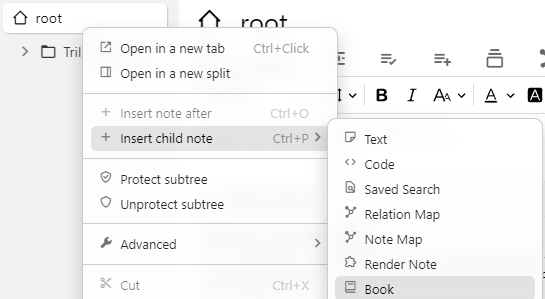
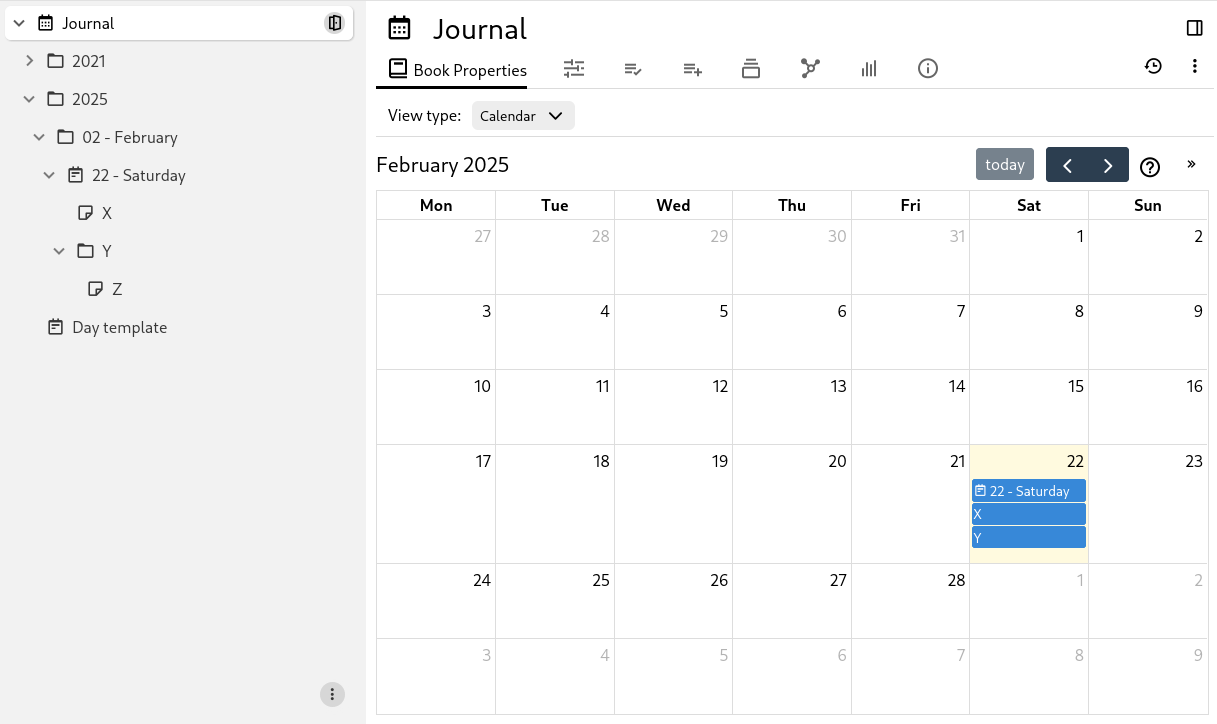
Creating a calendar#
Right click on an existing note in the Note Tree and select Insert child note and look for Calendar.
Creating a new event/note#
- Clicking on a day will create a new child note and assign it to that particular day.
- You will be asked for the name of the new note. If the popup is dismissed by pressing the close button or escape, then the note will not be created.
- It's possible to drag across multiple days to set both the start and end date of a particular note.
- Creating new notes from the calendar will respect the
~child:templaterelation if set on the Collection note.
Interacting with events#
- Hovering the mouse over an event will display information about the note.
- Left clicking the event will open a Quick edit to edit the note in a popup while allowing easy return to the calendar by just dismissing the popup.
- Middle clicking will open the note in a new tab.
- Right click will offer more options including opening the note in a new split or window.
- Drag and drop an event on the calendar to move it to another day.
- The length of an event can be changed by placing the mouse to the right edge of the event and dragging the mouse around.
Interaction on mobile#
When Trilium is on mobile, the interaction with the calendar is slightly different:
- Clicking on an event triggers the contextual menu, including the option to open in Quick edit.
- To insert a new event, touch and hold the empty space. When successful, the empty space will become colored to indicate the selection.
- Before releasing, drag across multiple spaces to create multi-day events.
- When released, a prompt will appear to enter the note title.
- To move an existing event, touch and hold the event until the empty space near it will become colored.
- At this point the event can be dragged across other days on the calendar.
- Or the event can be resized by tapping on the small circle to the right end of the event.
- To exit out of editing mode, simply tap the empty space anywhere on the calendar.
Configuring the calendar view#
In the Collections tab in the Ribbon, it's possible to adjust the following:
- Hide weekends from the week view.
- Display week numbers on the calendar.
- Set the slot duration (the length of each time row in day/week view).
- Set the slot label interval (how often time labels appear on the axis in day/week view).
Configuring the calendar using attributes#
The following attributes can be added to the Collection type:
| Name | Description |
|---|---|
#calendar:hideWeekends |
When present (regardless of value), it will hide Saturday and Sundays from the calendar. |
#calendar:weekNumbers |
When present (regardless of value), it will show the number of the week on the calendar. |
#calendar:initialDate |
Change the date the calendar opens on. When not present, the calendar opens on the current date. |
#calendar:view |
Which view to display in the calendar:
Any other value will be dismissed and the default view (month) will be used instead. The value of this label is automatically updated when changing the view using the UI buttons. |
#calendar:slotDuration |
Sets how long each timeslot is on the calendar. Defaults to 00:15:00 (15 minutes). Must have the format "HH:MM:SS". For example, to create timeslots for every 10 minutes, you would set #calendar:slotDuration="00:10:00". |
#calendar:slotLabelInterval |
Sets how often the timeslots on the calendar should be labeled. Defaults to 01:00:00 (1 hour). Must have the format "HH:MM:SS". For example, to label timeslots every 30 minutes, you would set #calendar:slotLabelInterval="00:30:00". |
~child:template |
Defines the template for newly created notes in the calendar (via dragging or clicking). |
In addition, the first day of the week can be either Sunday or Monday and can be adjusted from the application settings.
Configuring the calendar events using attributes#
For each note of the calendar, the following attributes can be used:
| Name | Description |
|---|---|
#startDate |
The date the event starts, which will display it in the calendar. The format is YYYY-MM-DD (year, month and day separated by a minus sign). |
#endDate |
Similar to startDate, mentions the end date if the event spans across multiple days. The date is inclusive, so the end day is also considered. The attribute can be missing for single-day events. |
#startTime |
The time the event starts at. If this value is missing, then the event is considered a full-day event. The format is HH:MM (hours in 24-hour format and minutes). |
#endTime |
Similar to startTime, it mentions the time at which the event ends (in relation with endDate if present, or startDate). |
#recurrence |
This is an optional CalDAV RRULE string that if present, determines whether a task should repeat or not. Note that it does not include the DTSTART attribute, which is derived from the #startDate and #startTime directly. For examples of valid RRULE strings see https://icalendar.org/rrule-tool.html |
#color |
Displays the event with a specified color (named such as red, gray or hex such as #FF0000). This will also change the color of the note in other places such as the note tree. |
#calendar:color |
❌️ Removed since v0.100.0. Use **#color** instead. Similar to #color, but applies the color only for the event in the calendar and not for other places such as the note tree. |
#iconClass |
If present, the icon of the note will be displayed to the left of the event title. |
#calendar:title |
Changes the title of an event to point to an attribute of the note other than the title, can either a label or a relation (without the # or ~ symbol). See Use-cases for more information. |
#calendar:displayedAttributes |
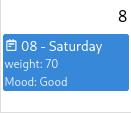
Allows displaying the value of one or more attributes in the calendar like this: 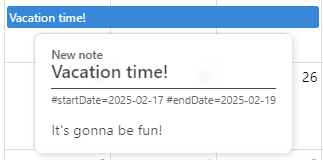 #weight="70" #Mood="Good" #calendar:displayedAttributes="weight,Mood" It can also be used with relations, case in which it will display the title of the target note: ~assignee=@My assignee #calendar:displayedAttributes="assignee" |
#calendar:startDate |
Allows using a different label to represent the start date, other than startDate (e.g. expiryDate). The label name must not be prefixed with #. If the label is not defined for a note, the default will be used instead. |
#calendar:endDate |
Similar to #calendar:startDate, allows changing the attribute which is being used to read the end date. |
#calendar:startTime |
Similar to #calendar:startDate, allows changing the attribute which is being used to read the start time. |
#calendar:endTime |
Similar to #calendar:startDate, allows changing the attribute which is being used to read the end time. |
How the calendar works#
The calendar displays all the child notes of the Collection that have a #startDate. An #endDate can optionally be added.
If editing the start date and end date from the note itself is desirable, the following attributes can be added to the Collection note:
#viewType=calendar #label:startDate(inheritable)="promoted,alias=Start Date,single,date"
#label:endDate(inheritable)="promoted,alias=End Date,single,date"
#hidePromotedAttributes
This will result in:
When not used in a Journal, the calendar is recursive. That is, it will look for events not just in its child notes but also in the children of these child notes.
Recurrence#
The built in calendar view also supports repeating tasks. If a child note of the calendar has a #recurrence label with a valid recurrence, that event will repeat on the calendar according to the recurrence string.
For example, to make a note repeat on the calendar:
- Every Day -
#recurrence="FREQ=DAILY;INTERVAL=1" - Every 3 days -
#recurrence="FREQ=DAILY;INTERVAL=3" - Every week -
#recurrence="FREQ=WEEKLY;INTERVAL=1" - Every 2 weeks on Monday, Wednesday and Friday -
#recurrence="FREQ=WEEKLY;INTERVAL=2;BYDAY=MO,WE,FR" - Every 3 months -
#recurrence="FREQ=MONTHLY;INTERVAL=3" - Every 2 months on the First Sunday -
#recurrence="FREQ=MONTHLY;INTERVAL=2;BYDAY=1SU" - Every month on the Last Friday -
#recurrence="FREQ=MONTHLY;INTERVAL=1;BYDAY=-1FR" - And so on.
For other examples of valid RRULE strings see https://icalendar.org/rrule-tool.html
Note that the recurrence string does not include the DTSTART attribute as defined in the iCAL specifications. This is derived directly from the startDate and startTime attributes
If you want to override the label the calendar uses to fetch the recurrence string, you can use the #calendar:recurrence attribute. For example, you can set #calendar:recurrence=taskRepeats. Then you can set your recurrence string like #taskRepeats="FREQ=DAILY;INTERVAL=1"
Also note that the recurrence label can be made promoted as with the start and end dates.
Slot Duration & Slot Label Interval#
Trilium's calendar view is powered by FullCalendar, which gives you fine-grained control over how the time grid looks and behaves for day and week views. Two labels you can use to configure these views are #calendar:slotDuration and #calendar:slotLabelInterval. Understanding what each one does — and how they interact — lets you tailor the calendar to match your workflow, whether you're scheduling in 15-minute increments or planning out your day in broad hourly blocks.
These settings can also be adjusted from the Collections tab in the Ribbon.
Slot duration#
Controls how tall each time slot is on the calendar — essentially the smallest unit of time the grid is divided into. A shorter duration means more rows and finer granularity; a longer one means fewer, chunkier rows. The default is one row every 15 minutes.
Examples:
| Value | Result |
|---|---|
#calendar:slotDuration="00:15:00" |
One row every 15 minutes |
#calendar:slotDuration="00:30:00" |
One row every 30 minutes |
#calendar:slotDuration="01:00:00" |
One row every hour |
Label interval#
Controls how often a time label appears on the left-hand axis. This is independent of the slot size — you can have very small slots but only label every hour to keep the axis readable. The default is a time label shown every hour.
Examples:
| Value | Result |
|---|---|
#calendar:slotLabelInterval="00:30:00" |
Show a time label every 30 minutes |
#calendar:slotLabelInterval="01:00:00" |
Show a time label every hour |
Useful combinations#
#calendar:slotDuration |
#calendar:slotLabelInterval |
Result |
|---|---|---|
00:15:00 |
01:00:00 |
Fine grid, clean axis — good for busy schedules |
00:30:00 |
01:00:00 |
Standard calendar feel |
01:00:00 |
01:00:00 |
Simple hourly grid — good for day planning |
00:15:00 |
00:30:00 |
Fine grid, labels every 30 min — balanced detail |
Format#
Both values use HH:mm:ss format. Hours can go up to 24 (24:00:00), while minutes and seconds must be between 00 and 59. The minimum meaningful duration is 1 minute (00:01:00).
Use-cases#
Using with the Journal / calendar#
It is possible to integrate the calendar view into the Journal with day notes. In order to do so change the note type of the Journal note (calendar root) to Collection and then select the Calendar View.
Based on the #calendarRoot (or #workspaceCalendarRoot) attribute, the calendar will know that it's in a calendar and apply the following:
- The calendar events are now rendered based on their
dateNoteattribute rather thanstartDate. - Interactive editing such as dragging over an empty era or resizing an event is no longer possible.
- Clicking on the empty space on a date will automatically open that day's note or create it if it does not exist.
- Direct children of a day note will be displayed on the calendar despite not having a
dateNoteattribute. Children of the child notes will not be displayed.
Using a different attribute as event title#
By default, events are displayed on the calendar by their note title. However, it is possible to configure a different attribute to be displayed instead.
To do so, assign #calendar:title to the child note (not the calendar/Collection note), with the value being name where name can be any label (make not to add the # prefix). The attribute can also come through inheritance such as a template attribute. If the note does not have the requested label, the title of the note will be used instead.
|
 |
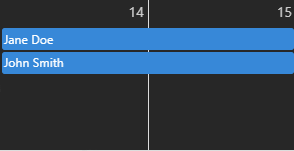
Using a relation attribute as event title#
Similarly to using an attribute, use #calendar:title and set it to name where name is the name of the relation to use.
Moreover, if there are more relations of the same name, they will be displayed as multiple events coming from the same note.
|
 |
Note that it's even possible to have a #calendar:title on the target note (e.g. “John Smith”) which will try to render an attribute of it. Note that it's not possible to use a relation here as well for safety reasons (an accidental recursion of attributes could cause the application to loop infinitely).
|
 |