Tables
Tables are a powerful feature for Text notes, since editing them is generally easy.
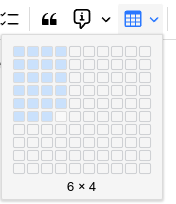
To create a table, simply press the table button and select with the mouse the desired amount of columns and rows, as indicated in the adjacent figure.
Formatting toolbar#
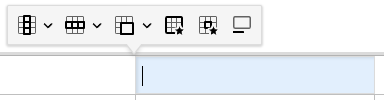
When a table is selected, a special formatting toolbar will appear:
Navigating a table#
- Using the mouse:
- Click on a cell to focus it.
- Click the
 button at the top or the bottom of a table to insert an empty paragraph near it.
 - Click the
 button at the top-left of the table to select it entirely (for easy copy-pasting or cutting) or drag and drop it to relocate the table.
- Using the keyboard:
- Use the arrow keys on the keyboard to easily navigate between cells.
- It's also possible to use Tab to go to the next cell and Shift+Tab to go to the previous cell.
- Unlike arrow keys, pressing Tab at the end of the table (last row, last column) will create a new row automatically.
- To select multiple cells, hold Shift while using the arrow keys.
Resizing cells#
- Columns can be resized by hovering the mouse over the border of two adjacent cells and dragging it.
- By default, the row height is not adjustable using the mouse, but it can be configured from the cell settings (see below).
- To adjust exactly the width (in pixels or percentages) of a cell, select the
 button.
Inserting new rows and new columns#
- To insert a new column, click on a desired location, then press the
 button from the formatting toolbar and select Insert column left or right.
 - To insert a new row, click on a desired location, then press the
 button and select Insert row above or below.
- A quicker alternative to creating a new row while at the end of the table is to press the Tab key.
Merging cells#
To merge two or more cells together, simply select them via drag & drop and press the ![]() button from the formatting toolbar.
button from the formatting toolbar.
More options are available by pressing the arrow next to it:
- Click on a single cell and select Merge cell up/down/right/left to merge with an adjacent cell.
- Select Split cell vertically or horizontally, to split a cell into multiple cells (can also be used to undo a merge).
Table properties#
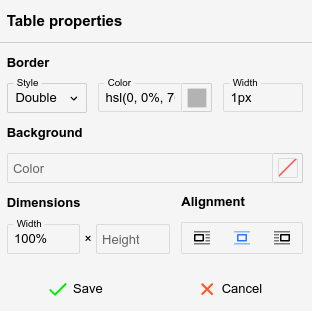
The table properties can be accessed via the ![]() button and allows for the following adjustments:
button and allows for the following adjustments:
- Border (not the border of the cells, but the outer rim of the table), which includes the style (single, double), color and width.
- The background color, with none set by default.
- The width and height of the table in percentage (must end with
%) or pixels (must end withpx). - The alignment of the table.
- Left or right-aligned, case in which the text will flow next to it.
- Centered, case in which text will avoid the table, regardless of the table width.
The table will immediately update to reflect the changes, but the Save button must be pressed for the changes to persist.
Cell properties#
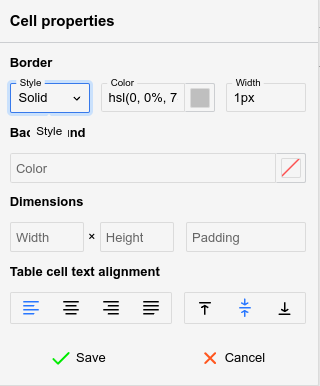
Similarly to table properties, the ![]() button opens a popup which adjusts the styling of one or more cells (based on the user's selection).
button opens a popup which adjusts the styling of one or more cells (based on the user's selection).
The following options can be adjusted:
- The border style, color and width (same as table properties), but applying to the current cell only.
- The background color, with none set by default.
- The width and height of the cell in percentage (must end with
%) or pixels (must end withpx). - The padding (the distance of the text compared to the cell's borders).
- The alignment of the text, both horizontally (left, centered, right, justified) and vertically (top, middle or bottom).
The cell will immediately update to reflect the changes, but the Save button must be pressed for the changes to persist.
Caption#
Press the ![]() button to insert a caption or a text description of the table, which is going to be displayed above the table.
button to insert a caption or a text description of the table, which is going to be displayed above the table.
Table borders#
By default, tables will come with a predefined gray border.
To adjust the borders, follow these steps:
- Select the table.
- In the floating panel, select the Table properties option (
 ).
).- Look for the Border section at the top of the newly opened panel.
- This will control the outer borders of the table.
- Select a style for the border. Generally Single is the desirable option.
- Select a color for the border.
- Select a width for the border, expressed in pixels.
- Select all the cells of the table and then press the Cell properties option (
 ).
).- This will control the inner borders of the table, at cell level.
- Note that it's possible to change the borders individually by selecting one or more cells, case in which it will only change the borders that intersect these cells.
- Repeat the same steps as from step (2).
Tables with invisible borders#
Tables can be set to have invisible borders in order to allow for basic layouts (columns, grids) of text or images without the distraction of their border:
- First insert a table with the desired number of columns and rows.
- Select the entire table.
- In Table properties, set:
- Style to Single
- Color to
transparent - Width to
1px.
- In Cell Properties, set the same as on the previous step.
Table indentation#
Since v0.104.1, tables can be indented as a block (the whole table moves, rather than just the content of a cell).
- Click the button to select the entire table. Otherwise, the indentation applies only to the current cell's content.
- Press Tab to increase the indent, or Shift+Tab to decrease it. Alternatively, use the indentation buttons in the formatting toolbar.
Markdown does not support indented tables, so the indentation is lost when converting to Markdown.
Markdown import/export#
Simple tables are exported in GitHub-flavored Markdown format (e.g. a series of | items). If the table is found to be more complex (it contains HTML elements, has custom sizes or images), the table is converted to a HTML one instead.
Generally formatting loss should be minimal when exported to Markdown due to the fallback to HTML formatting.